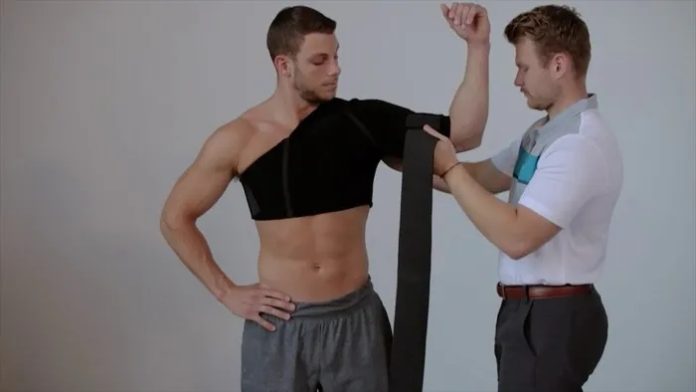
Understanding the Correct Way to Use a Shoulder Brace
Shoulder braces can be helpful for supporting an injured shoulder and preventing further damage. If you’ve recently sustained a shoulder injury, a brace can be beneficial, especially during activities that strain your shoulder. However, it’s crucial to know how to wear it correctly to get the most out of its benefits. A poorly fitted brace can do more harm than good. Picking the right shoulder brace is equally important for your comfort.
Typically, shoulder braces have straps or Velcro fasteners. Proper adjustment of these components is essential for effective use. Make sure your hand is comfortably positioned and not restricted within the brace. Ensure the sling isn’t too tight and feels comfortable on your arm.
How to Properly Put On a Shoulder Brace
Shoulder braces are designed to provide extra support to your shoulder and hand. Many people use them during the recovery phase after injuries. To maximize the brace’s benefits, you must wear it correctly.
Step 1: Inspect the Brace
Look at the brace’s design and construction. Is it equipped with Velcro or advanced straps that can be loosened or tightened? Get familiar with how it sits around your shoulder.
Typically, shoulder braces consist of two components:
- A strap that goes over your shoulder, similar to a car seatbelt, featuring a quick adjustment locking system.
- A second part where your arm will rest, equipped with an adjustable belt for a secure fit.
Understand these components before proceeding.
Step 2: Prepare the Brace
After understanding the brace’s functionality, prepare it for wearing. Unfold it if it came folded and unfasten the belt that goes around your shoulder and chest. Check for any other parts that need unlocking or adjusting.
Step 3: Slide Your Hand Through
Put your hand through the appropriate side of the brace and slide it up to your shoulder, ensuring the thick padding rests comfortably over the injured area. Pull the belt from your back, around to the front of your chest.
Step 4: Secure the Brace
Pull the locking belt snugly over your shoulder and back. Connect the two ends using the locking mechanism. The belt should be tight enough to offer support but not so tight that it puts extra pressure on your shoulder.
Step 5: Adjust the Upper Arm Strap
Using your other hand, adjust the upper arm strap. If you find this difficult, consider asking someone for help to avoid straining your injured shoulder. Ensure the strap fits snugly but not too tightly.
Additional Tips
Shoulder braces require specific guidance for correct usage. Consult a healthcare provider before wearing one to get personalized recommendations. Wear the brace when necessary but remember it isn’t a complete solution for all activities or conditions. Pay attention to sizing and material to maximize comfort and effectiveness.
Conclusion
Knowing how to properly use a shoulder brace can aid in your recovery process. The brace should offer snug yet comfortable support. Always consult with a healthcare provider before using any medical devices like a shoulder brace, as improper use can lead to further complications.


